FreshSplash via Getty Images
Lizard Pose Is the Deep Hip Opener You Need More of In Your Yoga Practice
Yoga experts share tips to help you sink deeper into Lizard Pose and enjoy all the benefits.
By Leigh Weingus•
Benefits of Lizard Pose (Utthan Pristhasana)
How to Do Lizard Pose Properly
Common Lizard Pose Variations
Common Mistakes In Lizard Pose
Precautions to Take During Lizard Pose
6 Tips for Practicing Lizard Pose
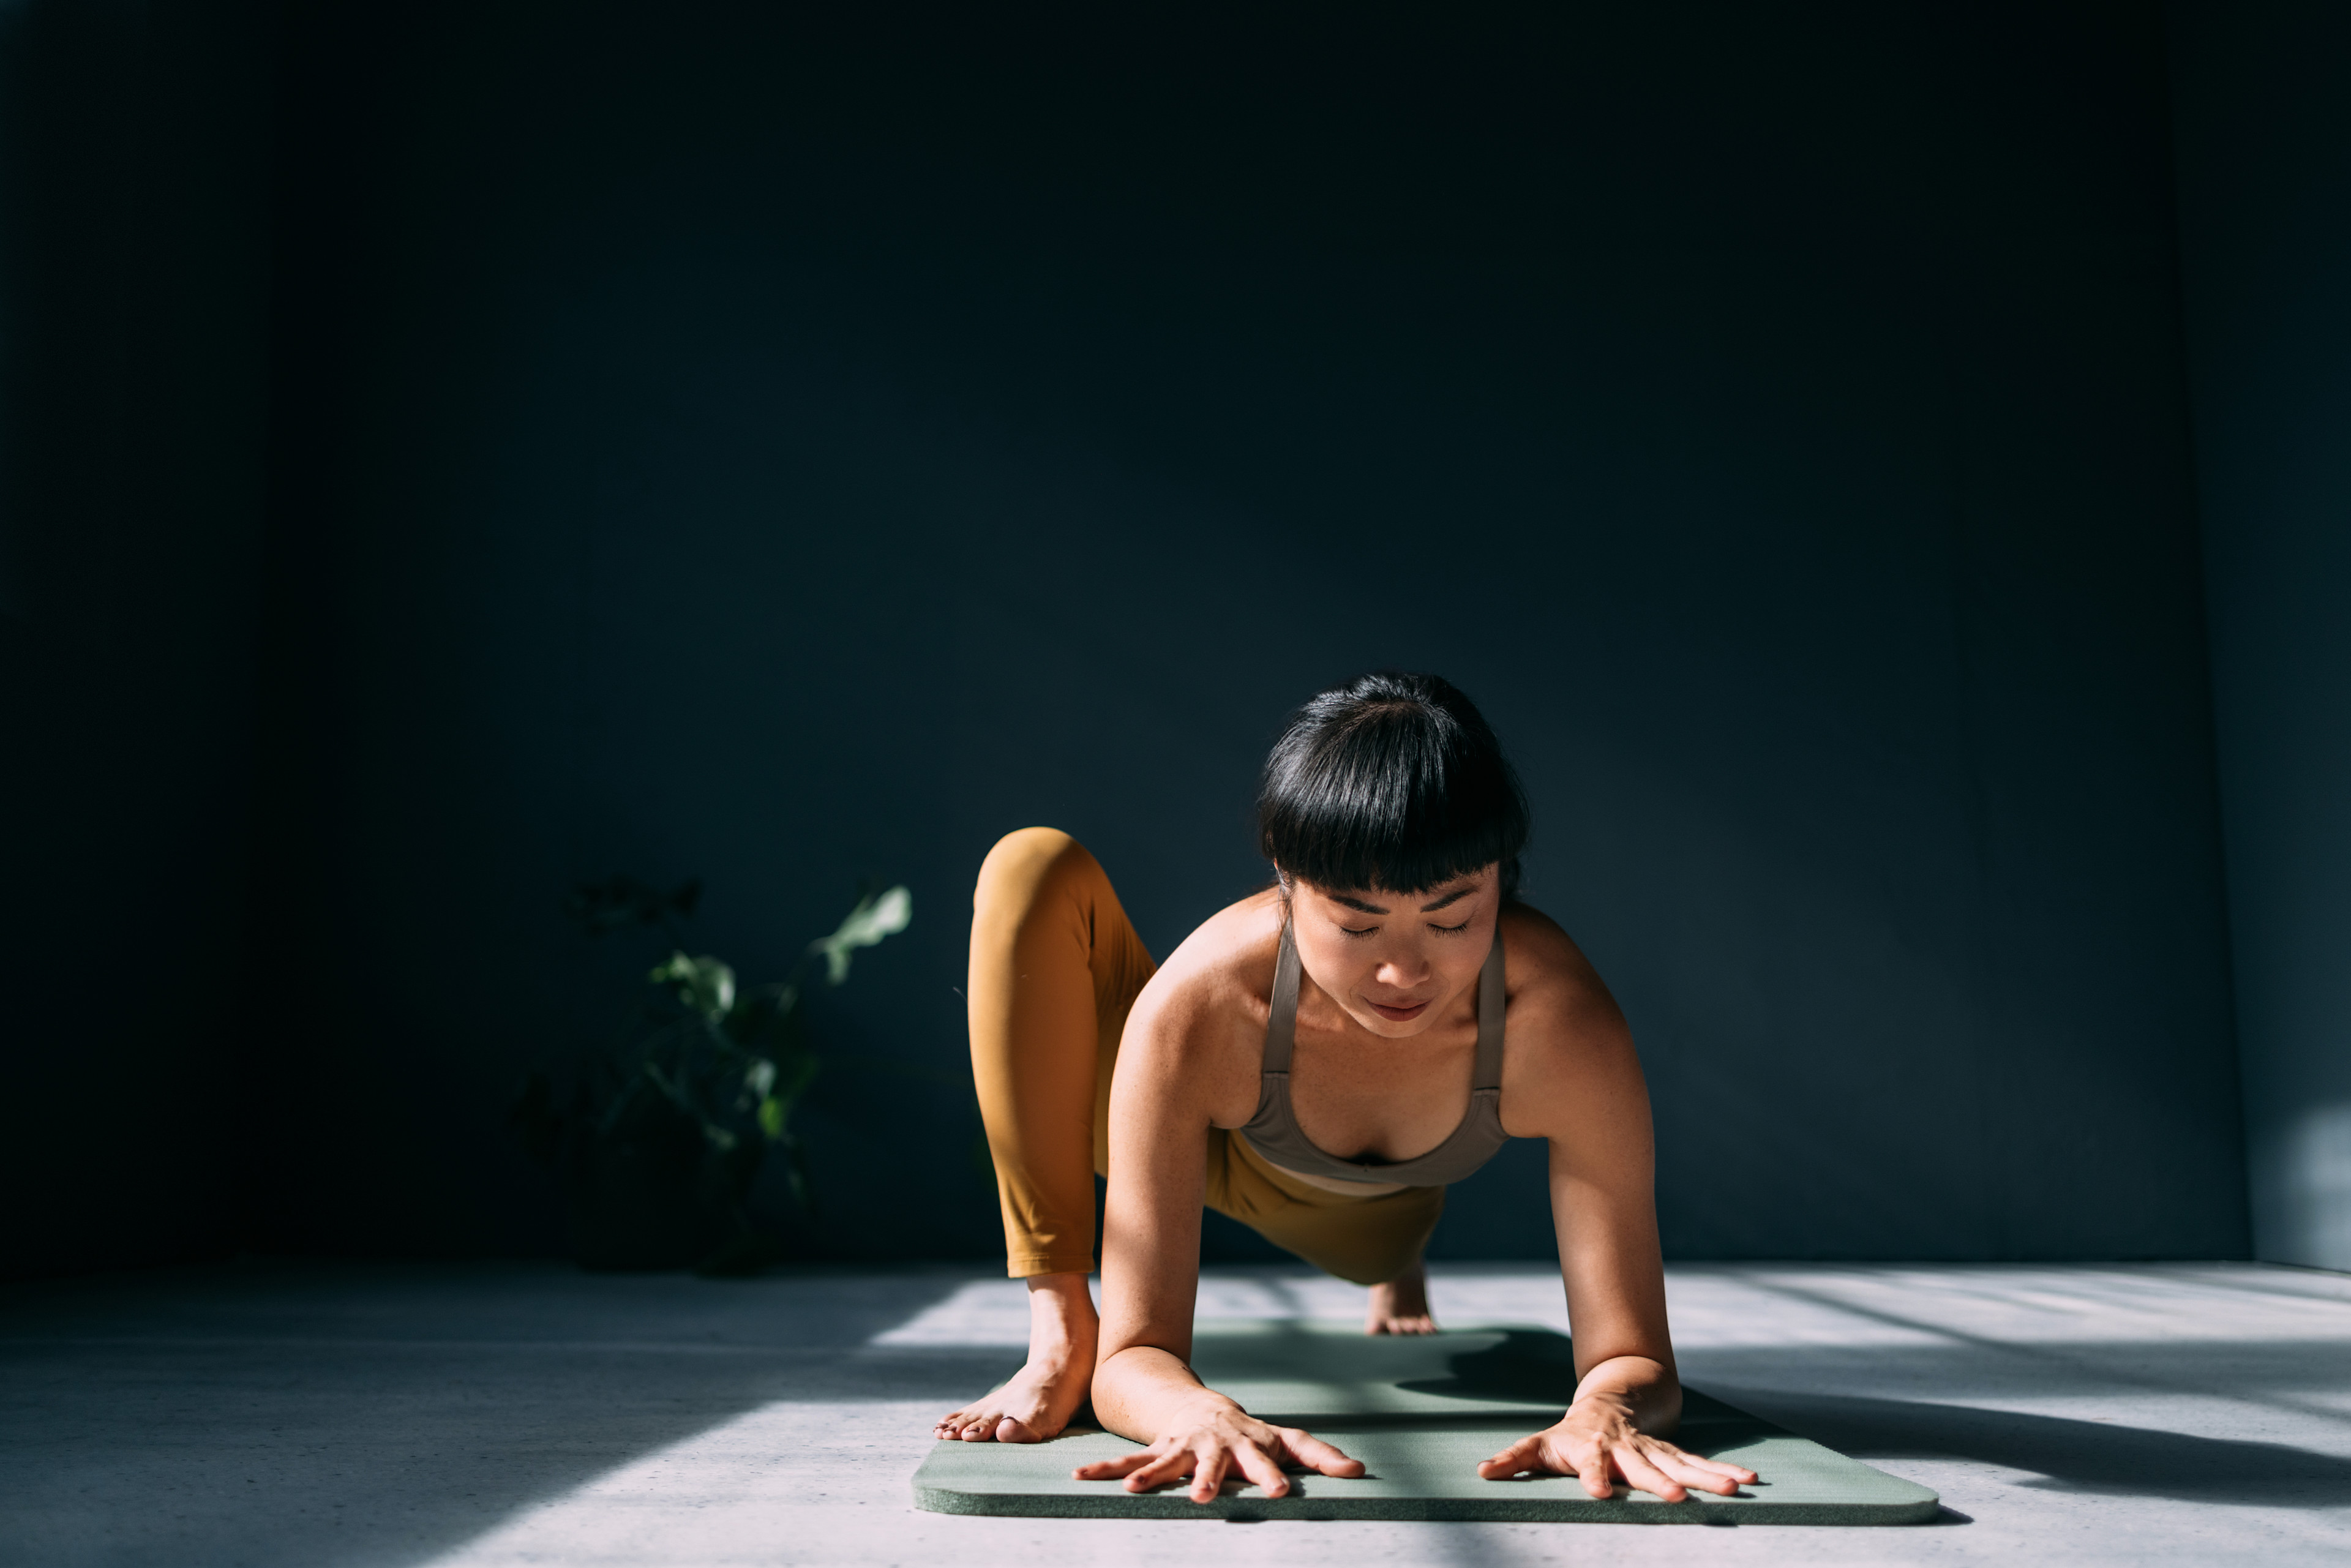
If you practice yoga, you’re probably familiar with Lizard Pose, or Utthan Pristhasana in Sanskrit. Lizard Pose was given its name thanks to how low the body gets to the ground in the pose, not unlike a lizard.
Discover more ways to reach your goals with Peloton


Lizard is a deep hip opener, but it’s friendly to yogis of all ability levels, thanks to the many available modifications. This asana is a great way to stretch the hips, but it’s a strengthening pose as well. “Lizard Pose targets the whole body as it improves an individual’s strength, flexibility, balance, and overall stability,” says physical therapist Nicole Jose.
Ready to explore Lizard Pose? Read ahead to learn all the things this pose can do for you, exactly how to do it, and expert tips for a safe practice.

Peloton App
Access thousands of classes with no equipment needed.
Benefits of Lizard Pose (Utthan Pristhasana)
Lizard Pose is packed with benefits, both strength and flexibility-wise. “Lizard Pose primarily stretches the hip flexors and glutes, but also stretches quads and hamstrings,” says Peloton instructor Denis Morton. Depending on the variation, this pose can also open the chest and shoulders, Jose adds—namely, if you’re practicing Revolved or Twisted Lizard (Parivrtta Utthan Pristhasana), and spiraling your chest open toward your front leg.
Lizard is a great hip opener, and this tension release may help those with lower back issues. “Lizard stretches the hip flexors, groin, hamstrings, and quadriceps, which typically affect one’s lower back if mobility is lacking,” Jose explains.
While you’re stretching all these muscles, Lizard Pose can also strengthen the muscles of the back, shoulders, core, and inner thighs, and improve balance and coordination, according to Denis.
Really, Lizard Pose can be calming or invigorating, depending on your approach, Denis says—you can let yourself relax into it for a gentler hip mobility exercise, or focus on activating your quads and hamstrings to build muscular endurance.
Not to mention, mastering Lizard Pose lays a strong foundation for more advanced yoga poses, Jose says, including some arm balances like Crow Pose (Kakasana) and other hip-openers like Bird of Paradise (Svarga Dvidasana).

How to Do Lizard Pose Properly
Here’s a step-by-step guide to doing Lizard Pose, according to Denis. If you prefer hearing an instructor’s cues in real time, try a Focus Flow: Lizard Pose class on the Peloton App, which is focused specifically on mastering this posture.
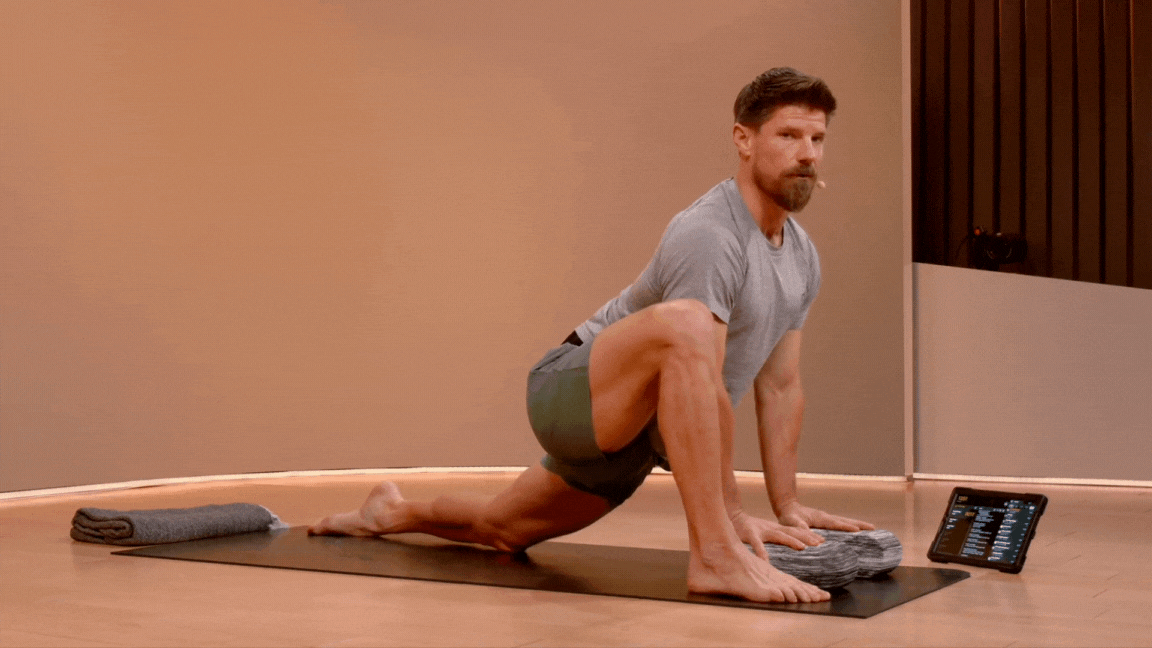
Start on all fours, hands under your shoulders and knees under your hips.
Step your right foot forward to the outside of your right hand, so your knee is directly over your ankle. Tuck your left toes under, extend your left leg backward, and lift your left knee off the floor, as if in a high plank position.
If your mobility allows, one arm at a time, lower your elbows to the floor, hinging at your hips, and trying to keep your back straight. If your back begins to round, don’t lower any further; stay on your palms, or place blocks under your hands or elbows for extra support.
Reach your chest forward to lengthen your spine, and think about drawing your right knee in toward your right shoulder.
Hold the pose for 3 to 5 breaths, breathing deeply.
To come out of the pose, straighten your arms and press your palms into the floor to lift your upper body, then step your right foot back to return to start. Then, repeat on the other side.
Common Lizard Pose Variations
As with almost every yoga pose, Lizard Pose can be easily modified. To make the pose less intense, Denis suggests taking a shorter step forward with the front leg and placing yoga blocks under the hands or elbows. Instead of floating your rear knee off the floor, you can also lower it to the ground, placing a blanket underneath to cushion it against the floor, if needed, Denis says.
If you’re looking to progress the pose, Denis suggests lengthening your stance and lowering your upper body even further, supporting yourself along the way with blocks or blankets and stopping anytime the back rounds or if you can no longer look forward.
If you’re performing the pose with your rear leg extended and knee off the floor, you can go even deeper by untucking the toes and extending them backward, resting the weight on the top of the foot, Denis says.
Common Mistakes In Lizard Pose
Jose says these are the most common mistakes people make in Lizard Pose:
Letting Your Head or Neck Fall Out of Alignment: Your neck should be a natural extension of your spine, so try not to crane it upward or drop it down. Keep your gaze soft and slightly forward to help maintain a neutral neck position.
Rounding Your Back: This often happens when you fold too deeply. Instead, hinge at the hips and lengthen through the spine, stopping as soon as your back starts to round.
Letting the Hips or Pelvis Rotate: If one hip drops or opens too far, it throws off the alignment of the whole pose and reduces its effectiveness. Actively square both hips toward the floor to stay stable and grounded.
Lifting Your Foot: Your front foot should stay fully grounded with the heel and all five toes pressing into the mat. Make sure to distribute your weight evenly to avoid straining your knee or ankle.
Misaligning the Front Knee: When the front knee moves beyond the ankle or drifts inward, it puts unnecessary pressure on the joint. Jose suggests keeping your knee stacked directly above the ankle to protect it.
Not Engaging the Core: Letting your core go slack can lead to instability and sagging in the lower back. Instead, lightly engage your core muscles by drawing your belly button gently towards your spine to support the back and pelvis.
Forgetting to Breathe: Holding your breath increases tension and reduces the pose’s benefits. Keep your breathing controlled by counting your breaths (you can even do this out loud) or using a steady rhythm to stay calm and present.


Precautions to Take During Lizard Pose
The very best thing you can do during Lizard Pose to avoid injury? Don’t go too fast.
“Take your time,” Denis says. “Use more props than you think you need, and don’t expect both sides of your body to progress at the same rate.” Bodies aren’t perfectly symmetrical, and based on how you move throughout the day and which side of your body is dominant, one side may be tighter or stronger than the other. So you may find you’re able to master Lizard Pose on the right side before the left (or vice versa). Rest assured, that’s perfectly normal.
Every time you enter a pose, Denis suggests thinking of it as a new and unique experience—don’t assume both sides will feel the same, or that your expression of Lizard today will match that of yesterday or last week. “Slowing down, paying attention to the feedback your body is giving you, and managing ego and expectations will maximize results,” Denis says.
6 Tips for Practicing Lizard Pose
Denis and Jose recommend the following tips for incorporating Lizard Pose into your yoga practice.
1. Warm Up with Simpler Poses and Progress
Lizard Pose can be intense, especially for beginners. Practicing gentler hip openers or lower lunge variations first can help you ease in with confidence. Pigeon Pose (Eka Pada Rajakapotasana)—with or without props—is a great pose to help you prep for Lizard.
2. Don't Rush
Ease into Lizard Pose with patience. (You don’t get a prize for going quickly!) Begin by grounding your hands or forearms, using blocks if needed, and letting your hips gently open over time.
3. Listen to Your Body
Notice what your body is saying. Are you holding tension in your jaw? Are your hips gripping, or is your breath shallow? Let the pose be a conversation, not a command. Pay attention to what feels like a challenge versus what feels like strain. Pushing too hard, too fast, can lead to injury. Especially with deeper poses like Lizard, learning your limits is part of the practice. Adjust as needed with props or other modifications so you don’t push past your limits and injure yourself.
4. Stretch Daily, Especially Your Hips and Spine
To support Lizard Pose and help you go deeper, make a habit of stretching your upper and lower body each day. Hip openers, spinal mobility work, and gentle leg stretches can help build the foundation you need.
5. Integrate Core Strength and Balance Into Your Practice
Exercises that build core stability and balance, like planks, lunges, or standing poses, can help you feel more grounded and controlled in Lizard.
6. Remember: Consistency and Intention Are More Important Than Time or Intensity
You don’t need to stay in Lizard Pose for five intense minutes or go deeper than your body wants you to. Instead, return to it regularly, even for short holds. Over time, your hips will soften, your back will get stronger, your breath will deepen, and you’ll start to notice the benefits.
As far as yoga poses go, Lizard Pose requires a decent amount of strength and flexibility. If it feels impossible when you first try it, don’t get discouraged—with regular prop use, practice, and modifications, you’ll slowly find the pose easier to drop into. Lizard Pose is one of the best hip openers and strengthening poses out there, so if it’s already part of your practice, great! And if it’s not, there’s no time like the present to start incorporating it.


This content is for informational and educational purposes only and does not constitute individualized advice. It is not intended to replace professional medical evaluation, diagnosis, or treatment. Seek the advice of your physician for questions you may have regarding your health or a medical condition. If you are having a medical emergency, call your physician or 911 immediately.

Want to strengthen your yoga practice?
We can help. Enter your email to get articles, instructor tips, and updates from Peloton sent to your inbox.
By providing your email address, you agree to receive marketing communications from Peloton.
For more about how we use your information, see our Privacy Policy.