
Prostock-Studio/iStock/Getty Images Plus via Getty Images
A Step-By-Step Guide to Practicing Bridge Pose
There's good reasons why this pose is included in so many classes.
By Elizabeth Millard•
What Is Bridge Pose In Yoga?
Benefits of Bridge Pose
How to Do Bridge Pose
Common Mistakes to Avoid In Bridge Pose
How to Modify or Progress Bridge Pose


In many yoga classes, you may be cued to do Bridge Pose (Setu Bandha Sarvangasana) as part of a sequence done while lying on your back. Although it may seem like a simple pose—basically, you lift your hips with your feet planted firmly—there are nuances to keep in mind to make it more effective, and plenty of variations to try, if you want a little something different.
Let's take a look at Bridge Pose, including where it fits into a yoga practice, how to do it properly, and what you can get out of the posture.
What Is Bridge Pose In Yoga?
Bridge Pose is a gentle backbend and inversion posture that opens the chest and hips. It involves lying face-up on the floor, bending your knees, and pressing your feet into the floor to lift your hips, forming a sort of bridge with your body. Your thighs, hips, and abdomen are suspended, being held up on either end by your shoulders and feet.
You can practice Bridge Pose in a variety of ways—making it a dynamic stretch or strengthening pose, or more gentle and restorative.
For example, Bridge Pose can be performed later in a yoga sequence—often after the standing poses and balance poses are completed. That way, your muscles and spine are warmed up and you can move into a deeper stretch. However, Bridge Pose can also be incorporated into the beginning of a practice, as a way to warm up your spinal mobility and fire up muscles you'll use later, says Peloton instructor Kirra Michel.
"Typically, I sequence Bridge towards the end of class to ensure the spine, hips, and shoulders are warmed up," she notes. "Sometimes, though, I sequence a gentle, dynamic bridge at the beginning to help warm up the spine, glutes, and shoulders."

Peloton App
Access thousands of classes with no equipment needed.
Which Muscles Does Bridge Pose Work?
There’s a lot going on during Bridge Pose. “Bridge assists in mobility, flexibility, and strength of the spine, back muscles, glutes, and shoulders,” Kirra says. “And it also helps stretch and strengthen the thighs, psoas, core, and chest.”
From a strength perspective, Bridge Pose is similar to glute bridges done in strength training or Pilates classes; it engages the core and muscles along the back of the body as you lift into the position, hold it, and then release back to the floor. These are the primary muscles you’ll tap into during Bridge Pose:
Gluteus Maximus: This large glute muscle is the primary driver for lifting your hips into the pose and keeping you stable.
Hamstrings: These muscles, which run along the back of your thighs, also work to straighten, stabilize, and lift your hips.
Erector Spinae: These back muscles run along your spine from the base of your skull to your tailbone. They work with the rest of your core and hip muscles to stabilize your spine and keep your back lifted off the ground.
Triceps: Your triceps, the muscles on the back of your upper arms, don’t play a part in the main bridge motion (lifting and holding your hips off the ground), but they do help to straighten your arms and press into the floor—especially if you take the variation of the pose where you clasp your hands underneath your body.
Benefits of Bridge Pose
Although it may look simple to an observer, Bridge Pose involves a combination of strength, mobility, focus, and endurance. Other major benefits include:
Extends the Spine
“Bridge mobilizes and extends the spine, which is essential for those of us who sit for most of the day,” Kirra says. For instance, sitting for prolonged periods in spinal flexion (rounded forward) can cause the vertebrae to become compressed over time—which then increases the risk of back pain and slouching, making the problem worse. Regularly extending the spine (lengthening it and bending it backward) can help counteract this compression.
Stretches the Hip Flexors
Another risk of sitting too much is developing tightness in the hip flexors. These are the muscles in the front of your hips, and sitting can "shorten" them if you don't stretch or stand up often enough. Over time, this can be another contributor to back pain as well as reduced mobility. By opening up the front of your body, Bridge Pose stretches the hip flexors in a safe, effective way.
Engages the Glutes
Like the glute bridges you might do in a Peloton strength class, Bridge Pose is great at activating and strengthening the glutes. Your glutes are important for running, jumping, cycling, and rowing, but they also help stabilize your pelvis and support your core.
Calms the Mind
Any pose where the head is below the heart is called an inversion in yoga. For example, consider Standing Forward Fold (Uttanasana), where your head is hanging toward your feet, Headstand (Sirsasana), or Handstand (Adho Mukha Vrksasana). Bridge Pose offers this type of inversion in a more modest way, but it still brings the benefits of those poses, says Kirra. "Having your head below the heart calms the mind," she adds.
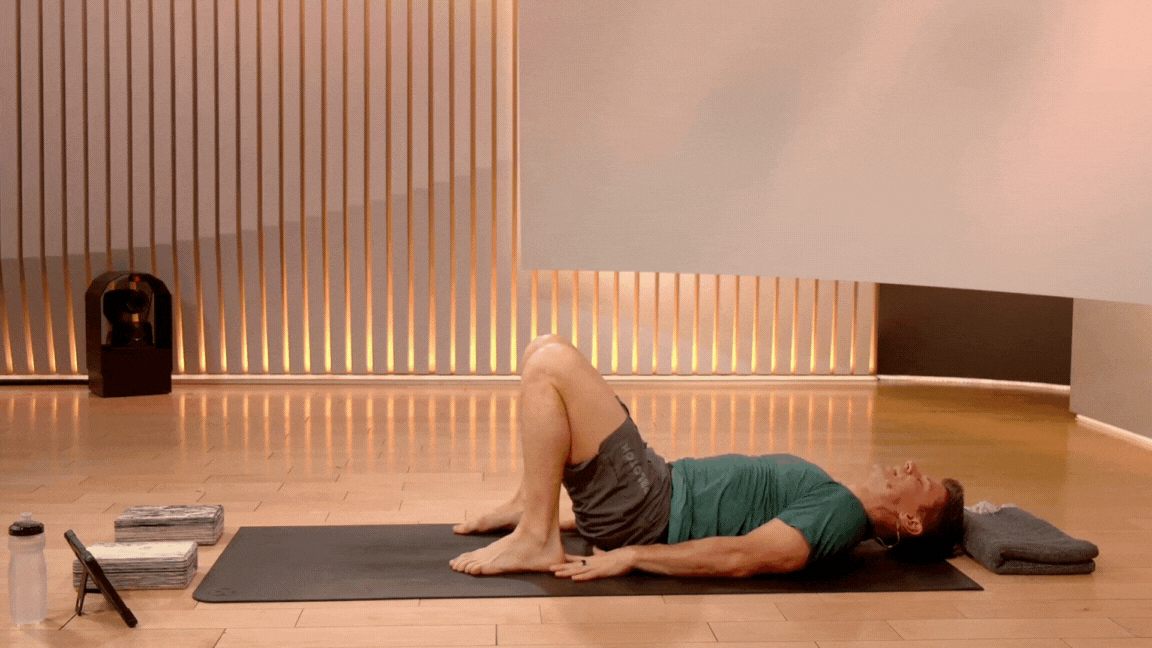
How to Do Bridge Pose
Here’s how to do Bridge Pose, step-by-step. If you’d prefer hearing guidance in real time, consider cueing up one of the Focus Flow classes on the Peloton App dedicated entirely to Bridge Pose.
Lie on your back with your knees bent and feet flat on the floor, about hip-width apart. Place your arms at your sides with palms pressing into the mat. Your heels should be just past your fingertips. Tuck your pelvis slightly to engage your core.
Inhale deeply and press into your feet to lift your hips off the floor. Keep your knees parallel, not knocking in toward each other or moving out to the sides.
Allow your chest to open up and move slightly toward your chin. Aim for a slight arch in your back—unlike a glute bridge, in which your back is neutral. The key word here is "slight." Avoid overarching, because it can cause compression and pain in the lower back, Kirra says. Think of this as a mini chest opener, but not a full backbend.
Keep your shoulders firmly planted on the ground and gaze up toward the ceiling so your neck stays in line with your spine.
Continue to press into your feet to keep your legs engaged and press your palms against the ground but try to keep your shoulders somewhat relaxed.
Hold the pose for five breaths, then slowly lower the hips.


Common Mistakes to Avoid In Bridge Pose
Don’t hold your breath. It's easy to hold your breath during a yoga pose, particularly if it’s new to you or requires a lot of concentration. But remember that breathing is essential to yoga.
Don’t feel stuck in the pose. Bridge pose is highly adaptable. "Try not to be so rigid with it," Kirra says. "Give yourself permission to explore the shape in your body. For example, if having the feet at hip-width and parallel is hurting your knees or simply isn't comfortable, then step the feet wider or turn the feet out slightly."
Don’t move too quickly. Take your time moving in and out of Bridge Pose. Afterwards, give yourself time for the spine to neutralize, Kirra says. Lay for a couple of breaths with your hips and feet on the floor, knees knocking in.
Don’t turn your head. Because you bear weight on your neck and shoulders during Bridge pose, you should be cautious about moving your head. “Turning your head to the side becomes dangerous with the extra weight and pressure on the cervical spine,” Kirra explains. “Keep your head and neck in alignment, looking up, maintaining a natural curve in the neck.”
How to Modify or Progress Bridge Pose
Like many poses in yoga, Bridge Pose can be modified. You can introduce different variations into your practice to either make it more challenging or reduce the intensity and turn it into a more restorative, easy yoga pose. Here are some suggestions for both.
Modifications for an Easier Bridge Pose
If you find Bridge Pose to be too taxing, or feel like you can't get into the pose fully yet, try these modifications:
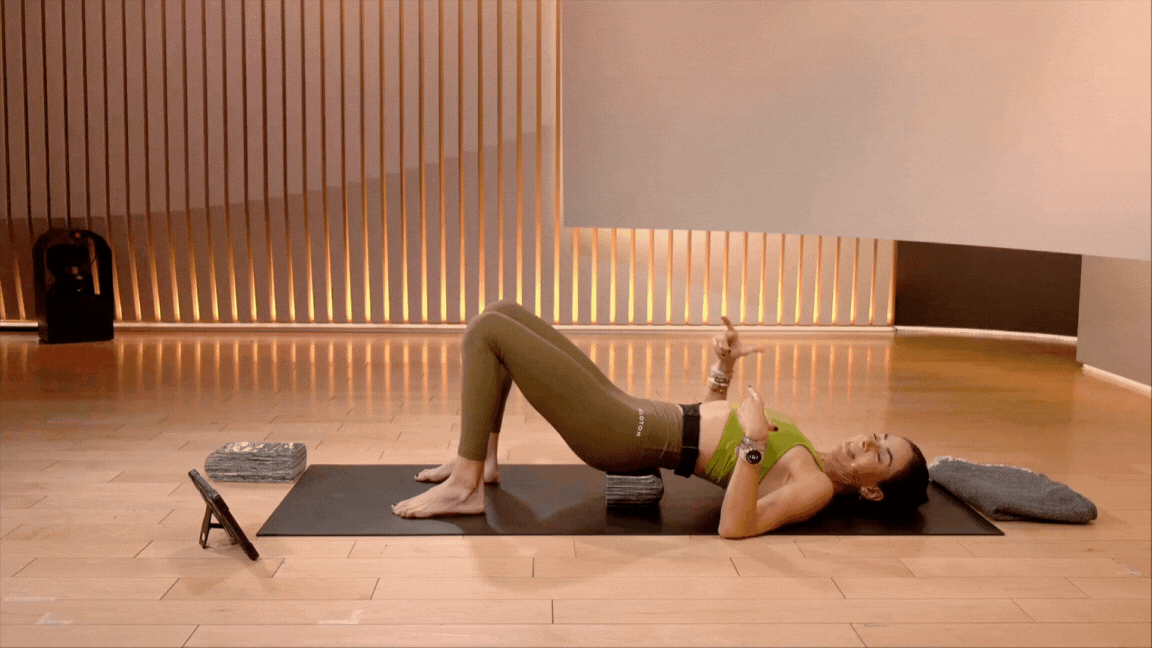
Squeeze a foam yoga block between the knees or thighs to keep your legs in alignment as you raise your hips and activate the hip adductors (your inner thigh muscles), Kirra says.
Don't bring your hips up as high. “Allow your body to feel comfortable at a lower height, eventually, over time, allowing the hips to lift higher,” Kirra says.
Practice Supported Bridge by placing a block under your lower back after you've lifted your hips. This turns it into a passive pose rather than an active one, Kirra says.
Modifications for a More Challenging Bridge Pose
If you're comfortable in regular Bridge Pose and you want to progress it to be more challenging, try these variations:
Clasp your hands on the mat underneath your lifted hips, and move into a deeper backbend (as shown above). This involves rolling each shoulder slightly under you while keeping the tops of your shoulders on the ground.
Extend one leg toward the ceiling and hold as your hips are lifted.
Try Bridge marches, which involve bringing one knee toward the chest at a time while keeping the glutes and hips lifted.
Play around with hamstring curls, sliding one heel out while hips are on the ground, then lift into Bridge, come back down, and slide the other heel out. Keep alternating as you lift up and down from Bridge Pose.
Progressing to Wheel Pose
One advantage to doing Bridge Pose regularly is that it will help you develop muscles that allow you to safely progress to Wheel Pose. This pose involves lifting yourself fully off the mat upside down (so your belly and chest are facing the ceiling), anchored by only your feet and hands. "Because Bridge helps stretch and strengthen the thighs, hip muscles, core, and chest, you'll be more ready for Wheel," Kirra says.
Whether you're trying challenging modifications or just perfecting the standard Bridge so it feels comfortable in your body, you'll be working on boosting your mobility, flexibility, and strength, according to Kirra. And like all yoga poses, the more often you do Bridge Pose, the more practiced you'll feel when it comes up in your yoga classes.


This content is for informational and educational purposes only and does not constitute individualized advice. It is not intended to replace professional medical evaluation, diagnosis, or treatment. Seek the advice of your physician for questions you may have regarding your health or a medical condition. If you are having a medical emergency, call your physician or 911 immediately.

Level up your inbox.
Subscribe for a weekly dose of fitness, plus the latest promos, launches, and events.
By providing your email address, you agree to receive marketing communications from Peloton.
For more about how we use your information, see our Privacy Policy.